Blog
Drools Installation
19 September, 2018
Related Blogs
Drools Installation
In this tutorial, we will go over Drools Installation step by step.
Drools enable an Eclipse-based IDE, however, at its core, just Java 1.5 (Java SE) is required.
A simple way to begin is to download and install the Eclipse plug-in. It also requires the Eclipse GEF framework to be installed. This enables all the dependencies to create a new rule project usually. Installing the Eclipse plug-in requires just unzipping a file into the Eclipse plug-in directory.
Use of the Eclipse plug-in is not necessarily required. Rule files are usually a textual input, and the IDE is another convenience. Rule engine can be integrated into various ways, and there is no "one size fits all".
Download and install Eclipse IDE.
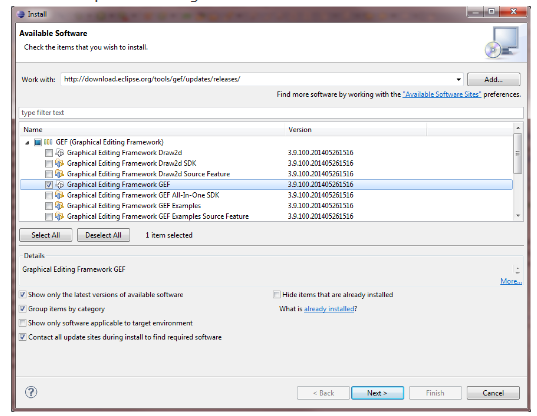
Install the GEF Plugin for Eclipse:
- Run Eclipse IDE.
- Select Help > Install New Software….
- In the Work with combo box type: http://download.eclipse.org/tools/gef/updates/releases/
- Select “Graphical Editing Framework GEF”.
| At TekSlate, we offer resources that help you in learning various IT courses. We avail both written material and demo video tutorials. To gain in-depth knowledge and be on par with practical experience, then explore Drools Training. |
Install Drools:
- Select Help > Install New Software….
- In the Work with combo box type: http://download.jboss.org/drools/release/6.1.0.Final/org.drools.updatesite/
- Select all.

Make sure the checkbox “Contact all update sites during install to find required software” is checked.
Create Drools Runtime:
- In Eclipse switch to the Drools perspective (upper right corner).
- Select File > New > Drools project.
- Choose a name and click “Next”.

Click “Next”.

| Check out the top Drools Interview Questions now! |
Click “Configure Workspace Settings…”.

Click “Add…”.

Click “Create a new Drools 6 Runtime…” and choose a directory to create the Drools Runtime.
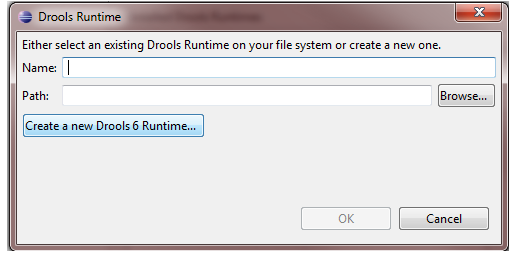
Select the created Drools Runtime and click “OK”.

Enter a GroupId, an ArtifactId, and a Version for your project. You may choose arbitrary non-empty values. Afterwards, click “Finish” to create the project.

- Open the class that contains the main method. It is located in the package
com.sampleand has the same name as the project. - To execute the project, right-click the editor and select debug As > Drools Application. Observe the output. You can ignore the SLF4J warnings.
For in-depth knowledge on Drools, click below: